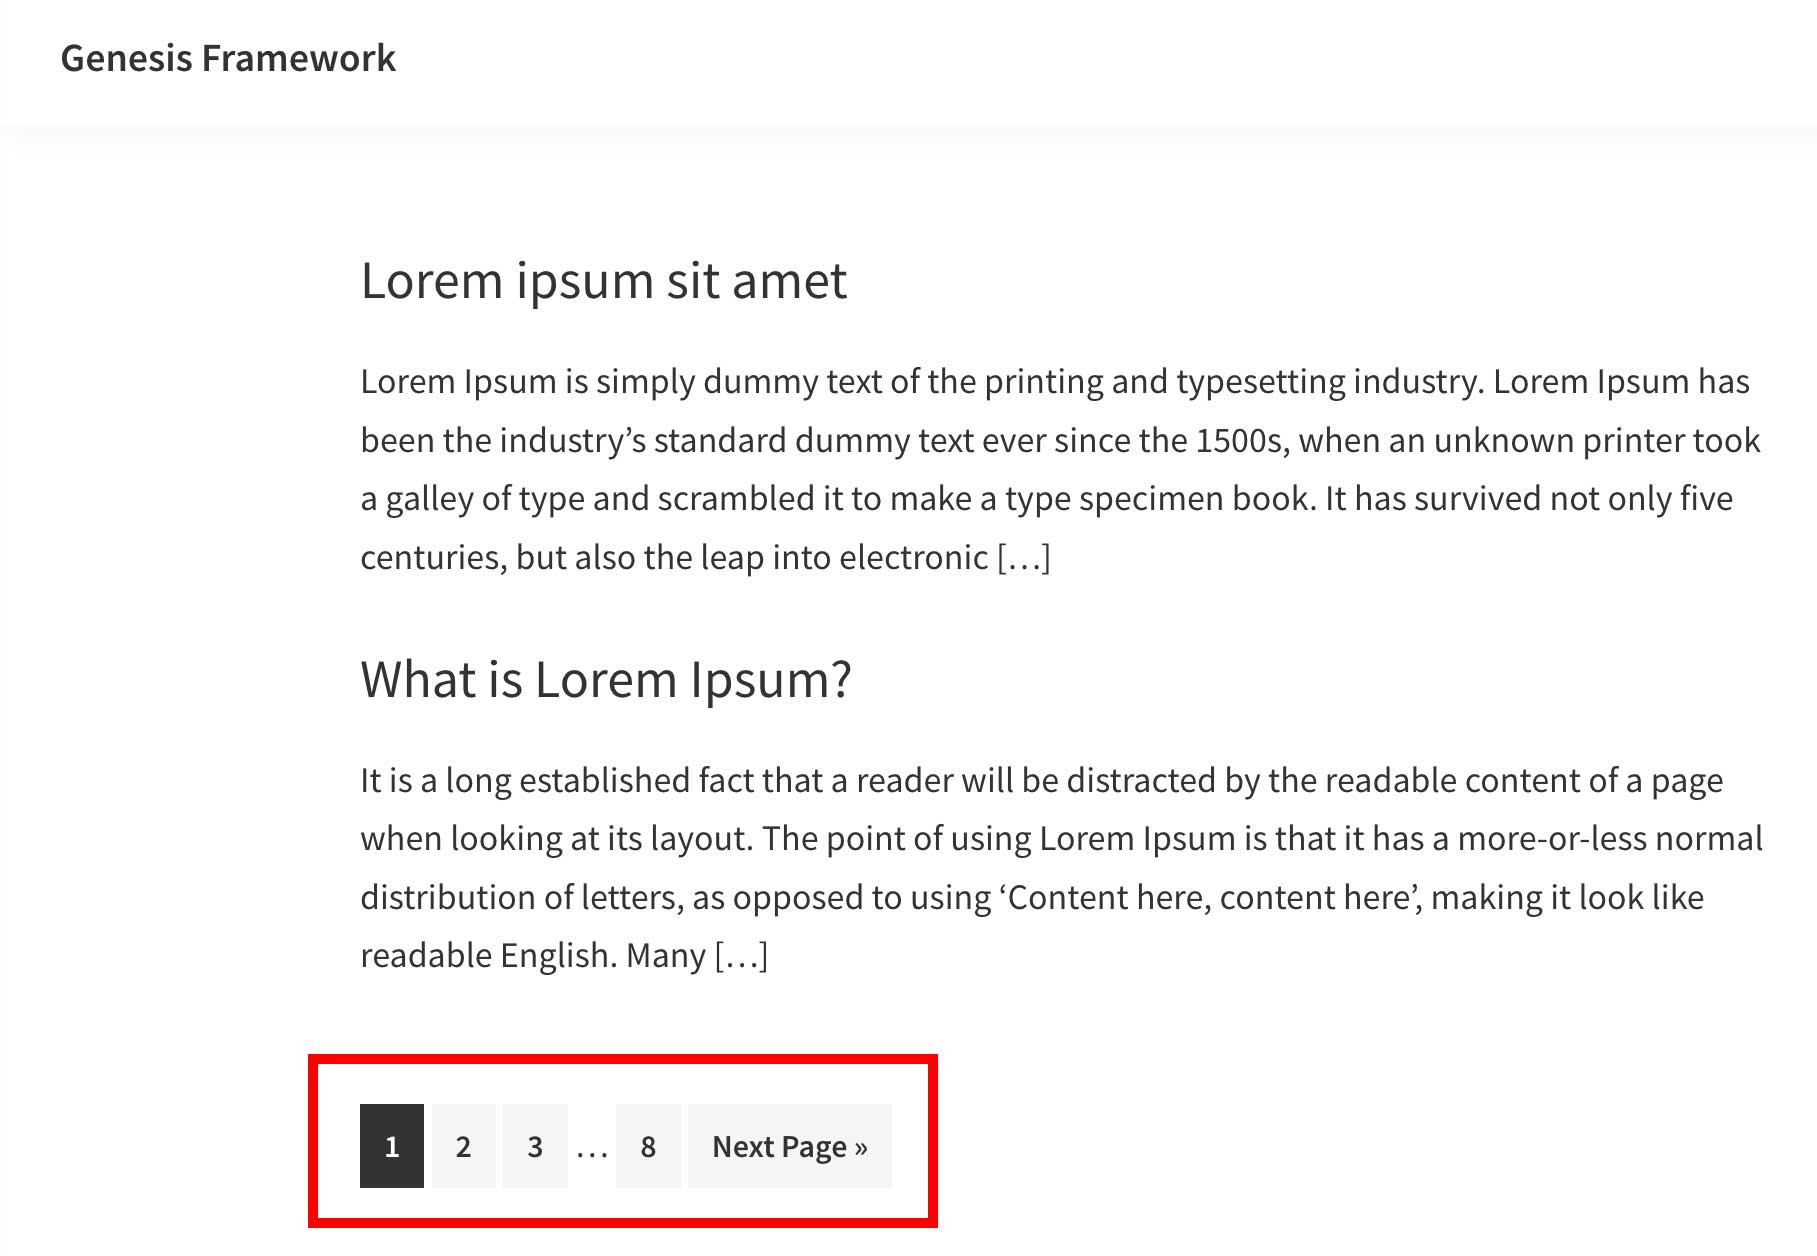
Custom Post Type with Pagination in Genesis
Do You want to create a Custom Post Type loop with the Genesis core pagination? In this post I’m gonna show You how to do it.
1) Create a Custom Post Type and add some posts to it
You can create a Custom Post Type with code, or You can use a plugin like Custom Post Type UI to do it.

2) Create a new page named Pagination and leave it blank

3) Create a genesis template file named page-pagination.php and place this code into it
If You set the slug of the previous created page after the file name page.php -> page-pagination.php, You don’t need to specify the Template name: Pagination right after the opening php tag.
<?php
// =========================================================================
// CUSTOM POST TYPE WITH PAGINATION
// =========================================================================
function custom_loop_with_pagination() {
	global $post;

	$args = array(
		'post_type'      => 'books',  //---YOUR CUSTOM POST TYPE
		'posts_per_page' => 4,        //---SET HOW MANY POSTS MUST BE SHOWN ON ONE PAGE
		'paged'          => get_query_var( 'paged' )
	);

	global $wp_query;
	$wp_query = new WP_Query( $args );

	if ( have_posts() ) :
		while ( have_posts() ) : the_post(); ?>

            <article>
                <h2><?php the_title(); ?></h2>
                <?php the_excerpt(); ?>
			</article>

		<?php endwhile;
		do_action( 'genesis_after_endwhile' );
	endif;

	wp_reset_query();
}
add_action( 'genesis_loop', 'custom_loop_with_pagination' );
remove_action( 'genesis_loop', 'genesis_do_loop' );


genesis();
4) The result will be look like this
How to add Pagination to the Archive of Custom Post Type in any WordPress Theme
Pagination function
Create a file named pagination.php in yout child theme and include it in your functions.php
<?php
// numbered pagination
function pagination($pages = '', $range = 4)
{
     $showitems = ($range * 2)+1;

     global $paged;
     if(empty($paged)) $paged = 1;

     if($pages == '')
     {
         global $the_query;
         $pages = $the_query->max_num_pages;
         if(!$pages)
         {
             $pages = 1;
         }
     }

     if(1 != $pages)
     {
         echo "<div class=\"archive-pagination pagination\">";
         echo "<ul>";
         if($paged > 2 && $paged > $range+1 && $showitems < $pages) echo "<a href='".get_pagenum_link(1)."'>
         <span class='double-chevron-wrapper'>
                <i class='fas fa-chevron-left first'></i>
                <i class='fas fa-chevron-left second'></i>
         </span>
            </a>";
         if($paged > 1 && $showitems < $pages) echo "<a href='".get_pagenum_link($paged - 1)."'> <i class='fas fa-chevron-left prev'></i></a>";

         for ($i=1; $i <= $pages; $i++)
         {
             if (1 != $pages &&( !($i >= $paged+$range+1 || $i <= $paged-$range-1) || $pages <= $showitems ))
             {
                 echo ($paged == $i)? "<li><span class=\"current\">".$i."</span></li>":"<li><a href='".get_pagenum_link($i)."' class=\"inactive\">".$i."</a></li>";
             }
         }

         if ($paged < $pages && $showitems < $pages) echo "<a href=\"".get_pagenum_link($paged + 1)."\"><i class='fas fa-chevron-right next'></i></a>";
         if ($paged < $pages-1 &&  $paged+$range-1 < $pages && $showitems < $pages) echo "<a href='".get_pagenum_link($pages)."'>
            <span class='double-chevron-wrapper'>
                <i class='fas fa-chevron-right first'></i>
                <i class='fas fa-chevron-right second'></i>
            </span>
            </a>";
         echo "</ul>\n";
         echo "</div>\n";

         echo "<div class='all_pages'><small>Current page: ".$paged." All pages ".$pages."</small></div>";
     }
}
?>
Create the WordPress Loop
Add the name of your terms
Set the posts_per_page value in the args
<?php
wp_reset_postdata();

$terms_name = 'YOUR_TERMS_NAME';

$paged = (get_query_var('paged')) ? get_query_var('paged') : 1;

$args = array(
    'post_type' => 'YOUR_POST_TYPE',
    'posts_per_page' => 2,
    'paged' => $paged,
    'tax_query' => array(
               array(
                   'taxonomy' => 'YOUR_TAXONOMY',
                   'field'    => 'slug',
                   'terms'    => $terms_name
               ),
           ),
);

$the_query = new WP_Query( $args ); ?>

    <!--YOUT CUSTOM CONTENT-->

    <h2><?php the_title(); ?></h2>

<?php echo pagination($the_query->max_num_pages); ?>
Add some line of CSS
.archive-pagination.pagination li {
	margin-left: 0 !important;
	margin-right: 10px !important;
}
.current {
	padding: 0.9rem 1.2rem;
	background: #124e84;
    color: white;
}
Echo something conditionally on the single page of specific Custom Post Type Taxonomy
// ==================================================================
// SINGLE PAGE OF SPECIFIC CPT TAXONOMY
// ==================================================================
function single_page_of_specific_cpt_taxonomy(){
    global $post;
    if(is_singular('YOUR_CPT')){
       foreach (get_the_terms(get_the_ID(), 'YOUR_TAXONOMY') as $cat) {
           //echo $cat->slug;
           if($cat->slug === 'YOUR_TERM'){
               echo 'YEAHHH!!!!';
           }
        }
    }
}
add_action('genesis_entry_content', 'single_page_of_specific_cpt_taxonomy');
Change “Related products” text in WooCommerce
// =========================================================================
// CHANGE RELATED PRODUCTS TEXT TO YOU MAY ALSO LIKE TEXT
// =========================================================================
function change_you_may_also_like( $translated ) {
   $translated = str_replace( 'Related products', 'You may also like...', $translated );
   return $translated;
}
add_filter( 'gettext', 'change_you_may_also_like' );
How to change “On Sale” text in WooCommerce
// =========================================================================
// CHANGE ON SALE TEXT
// =========================================================================
function woocommerce_custom_sale_text($text, $post, $_product){
    return '<span class="onsale">Special offer</span>';
}
add_filter('woocommerce_sale_flash', 'woocommerce_custom_sale_text', 10, 3);
How to add sticky footer to Genesis with flexbox
/* Sticky Footer */

.site-container {
     display: -ms-flexbox;
     display:-webkit-flex;
     display:-webkit-box;
     display:flex;
     -ms-flex-direction:column;
     -webkit-flex-direction:column;
     -webkit-box-orient:vertical;
     -webkit-box-direction:normal;
     flex-direction:column;
     min-height:100vh;
}

.site-inner {
     -ms-flex:1;
     -webkit-flex:1;
     -webkit-box-flex:1;
     flex:1;
     width: 100%;
     padding: 20px 0;
     word-wrap: break-word;
}
How to change Additional information text based on product ID in WooCommerce
// =========================================================================
// CHANGE ADDITIONAL INFORMATION TEXT
// =========================================================================
/* @return string Modified value for product's "Additional information" text. */
function wpdd_change_additional_information_heading() {
    global $product;
    if( $product->id == 2028 ){
	   return __( 'Further information', 'mytextdomain' );
    }elseif($product->id == 2027){
	   return __( 'En savoir plus', 'mytextdomain' );
    }else{
        return __( 'További információk', 'woocommerce' );
    }
}
add_filter( 'woocommerce_product_additional_information_heading', 'wpdd_change_additional_information_heading' );
Change “Add to cart” button text on specific pages in Woo
// =========================================================================
// CHANGE ADD TO CART BUTTON TEXT ON SPECIFIC PAGES
// =========================================================================
function translate_add_to_cart() {
    global $product;
    if( $product->id == 2028 ){
        return __( 'Add to basket', 'woocommerce' );
    } elseif($product->id == 2027){
        return __( 'Buy now', 'woocommerce' );
        }
    else{
        return __( 'Add to cart', 'woocommerce' );
    }
}
add_filter( 'woocommerce_product_single_add_to_cart_text', 'translate_add_to_cart', 10, 3 );
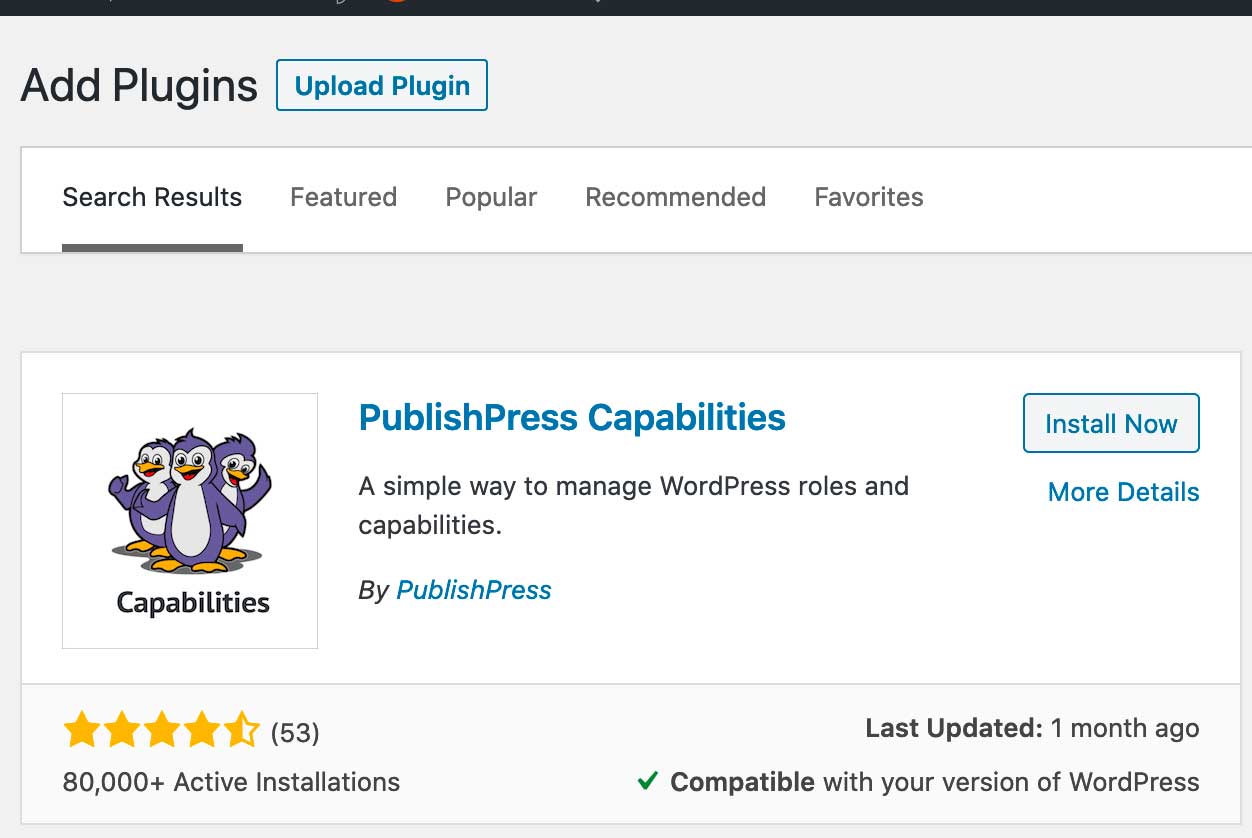
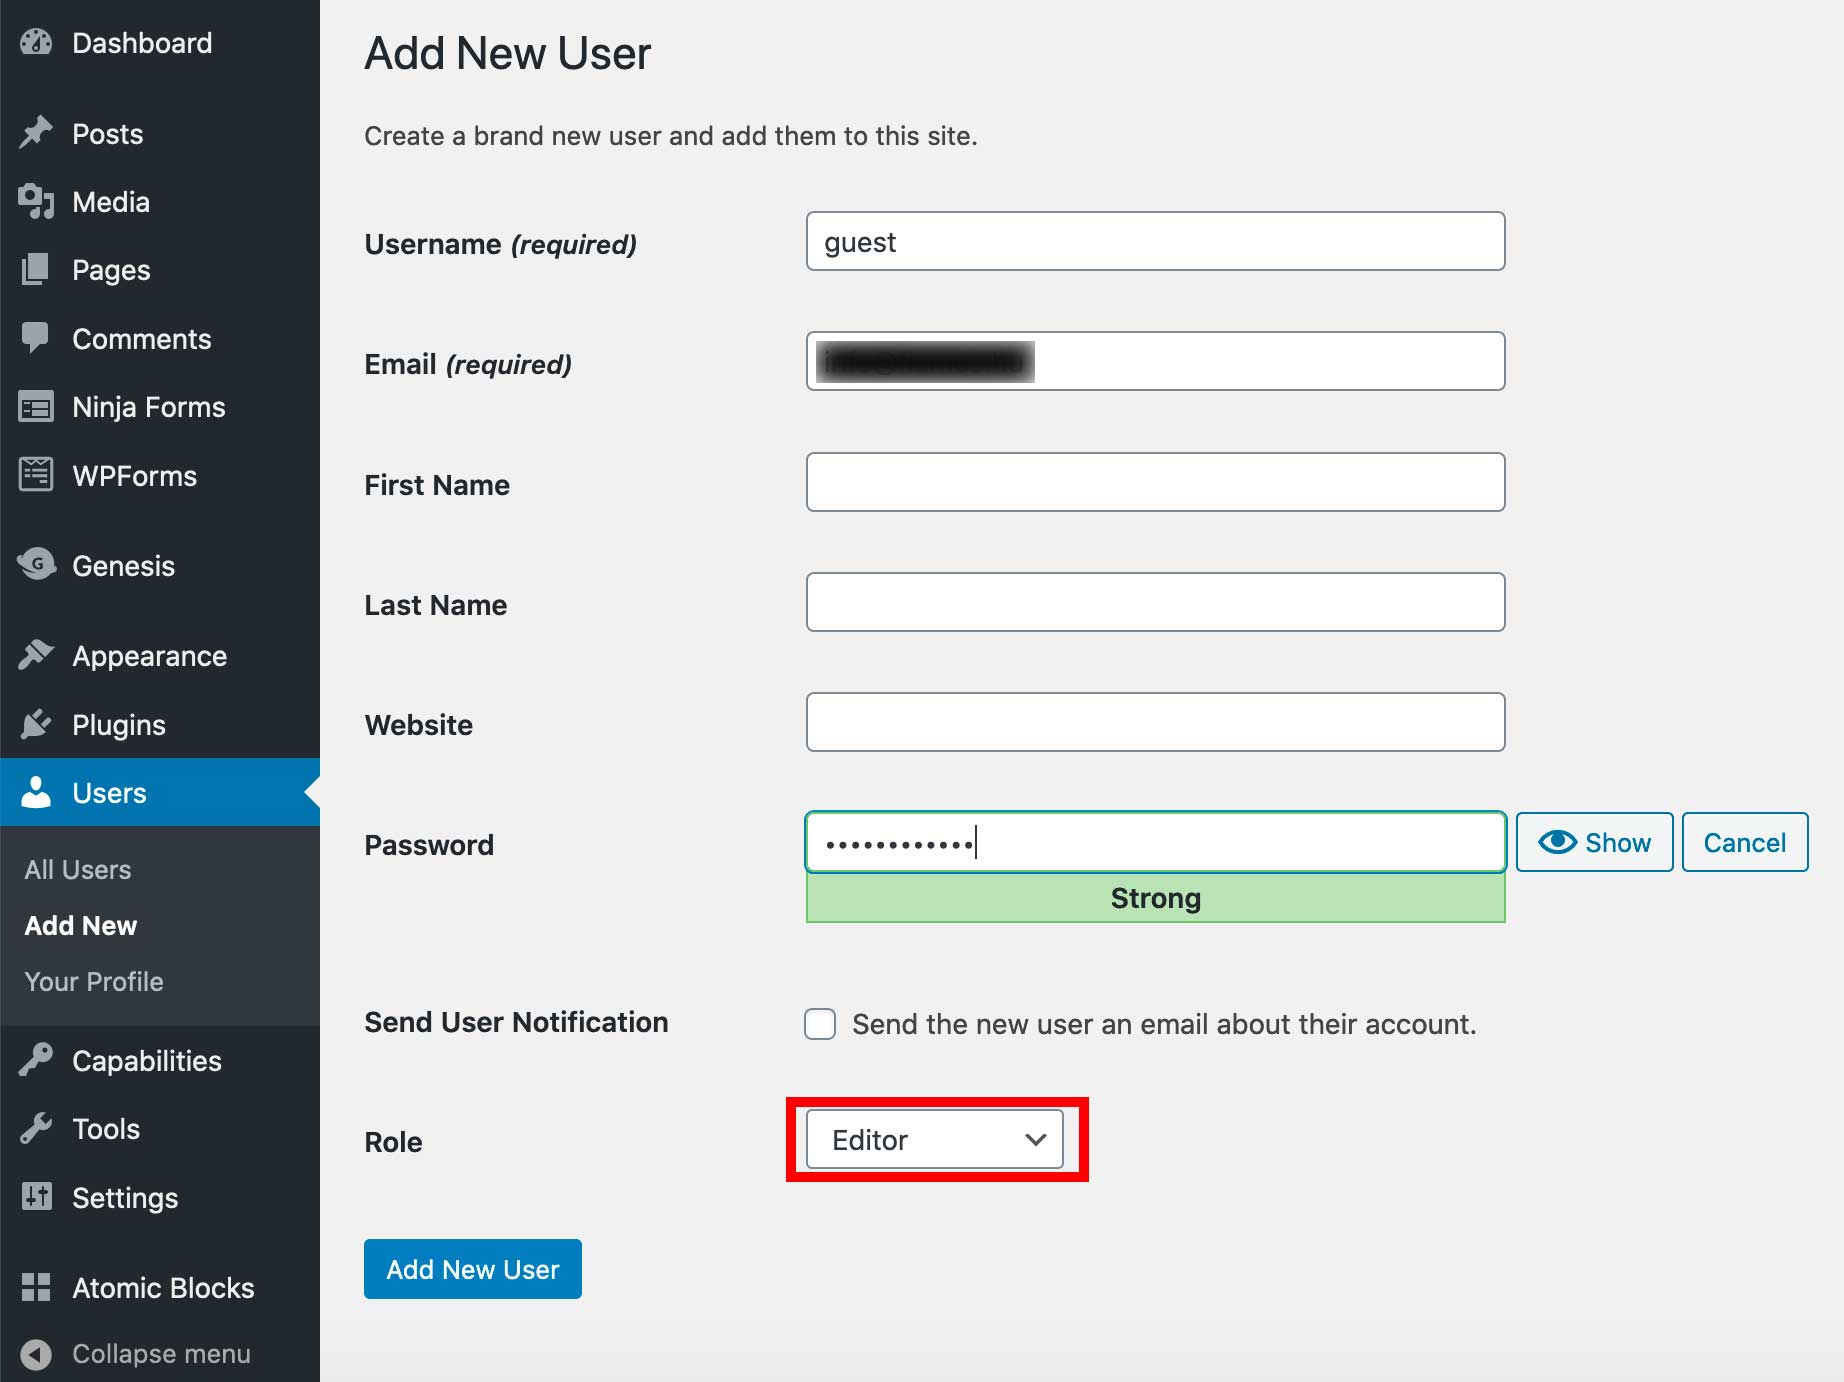
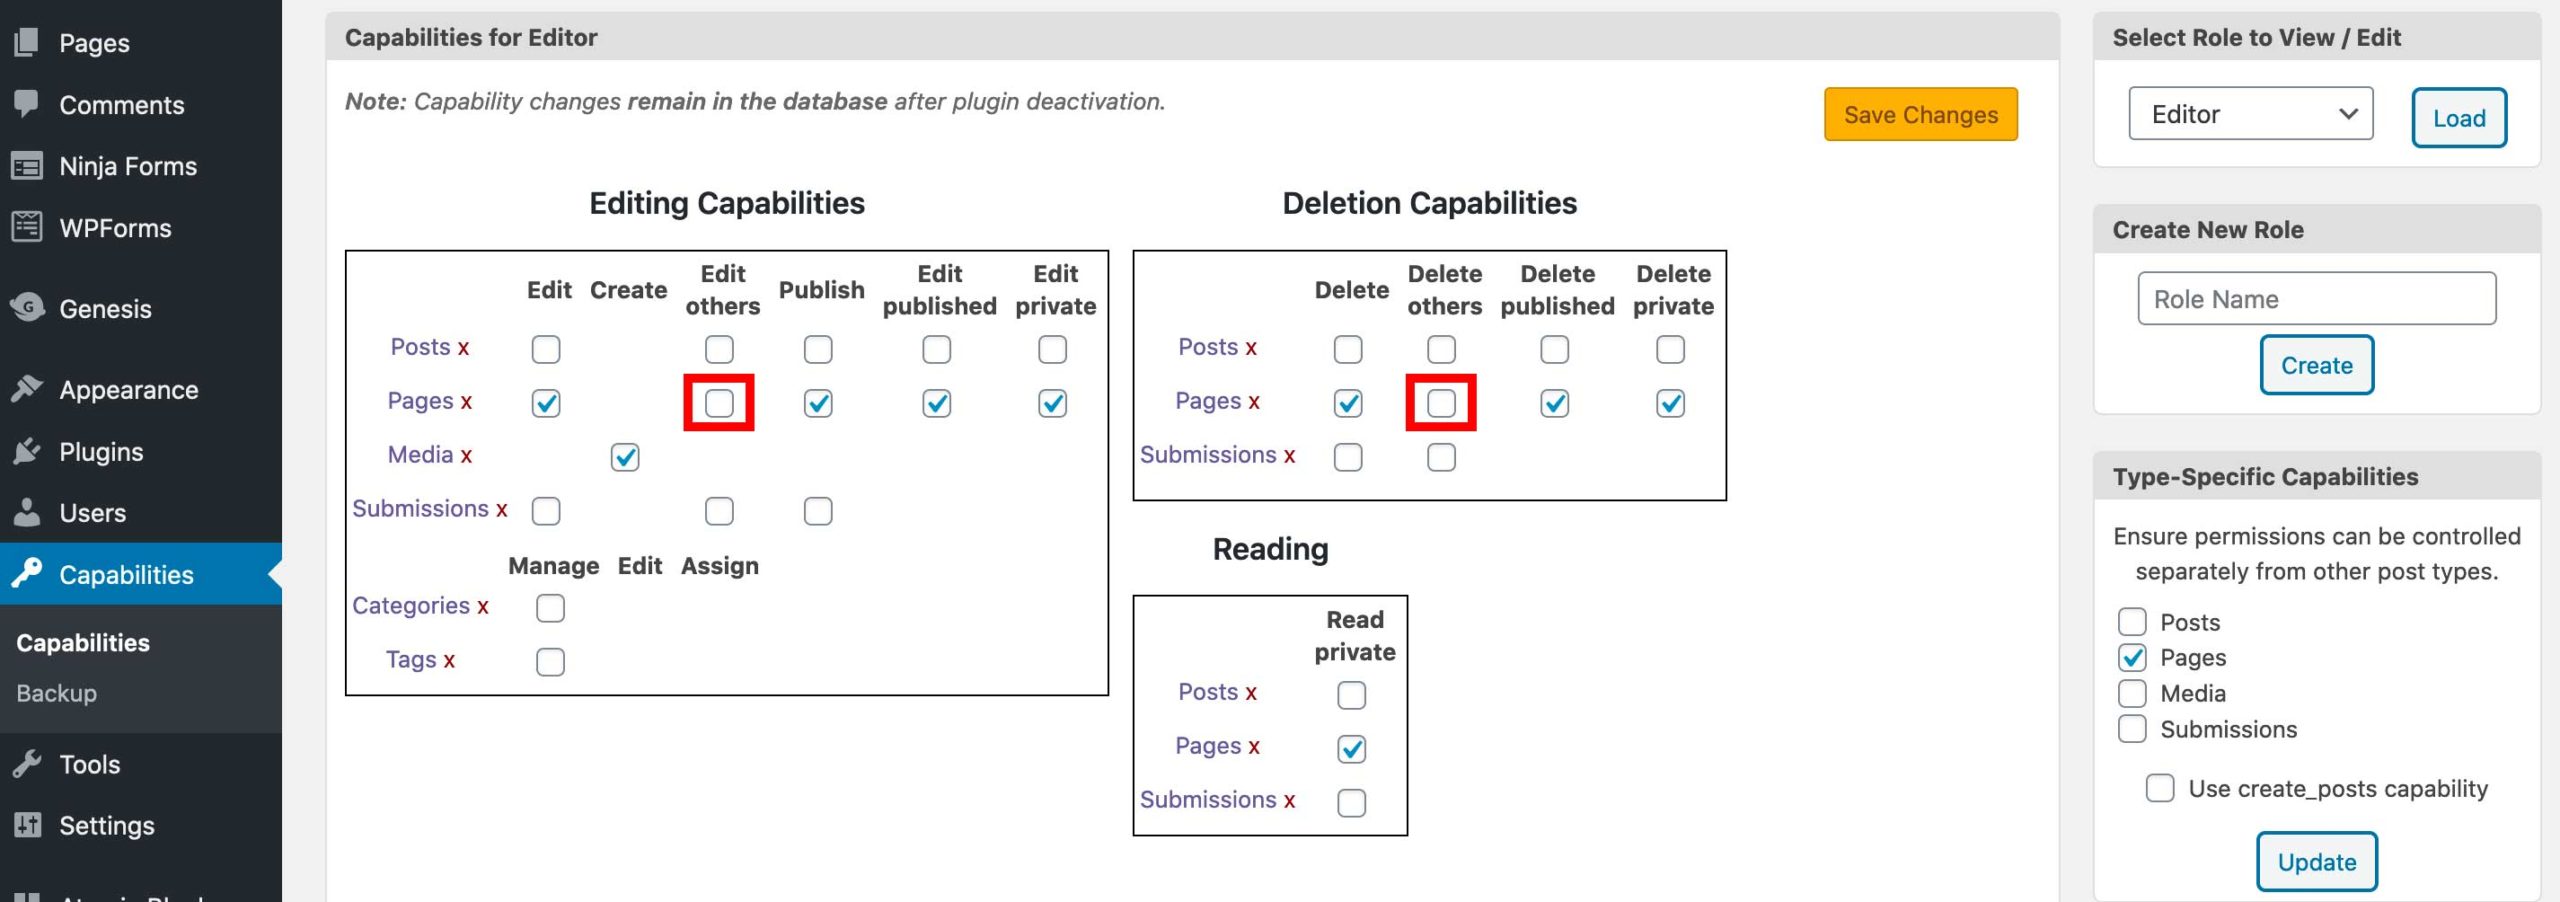
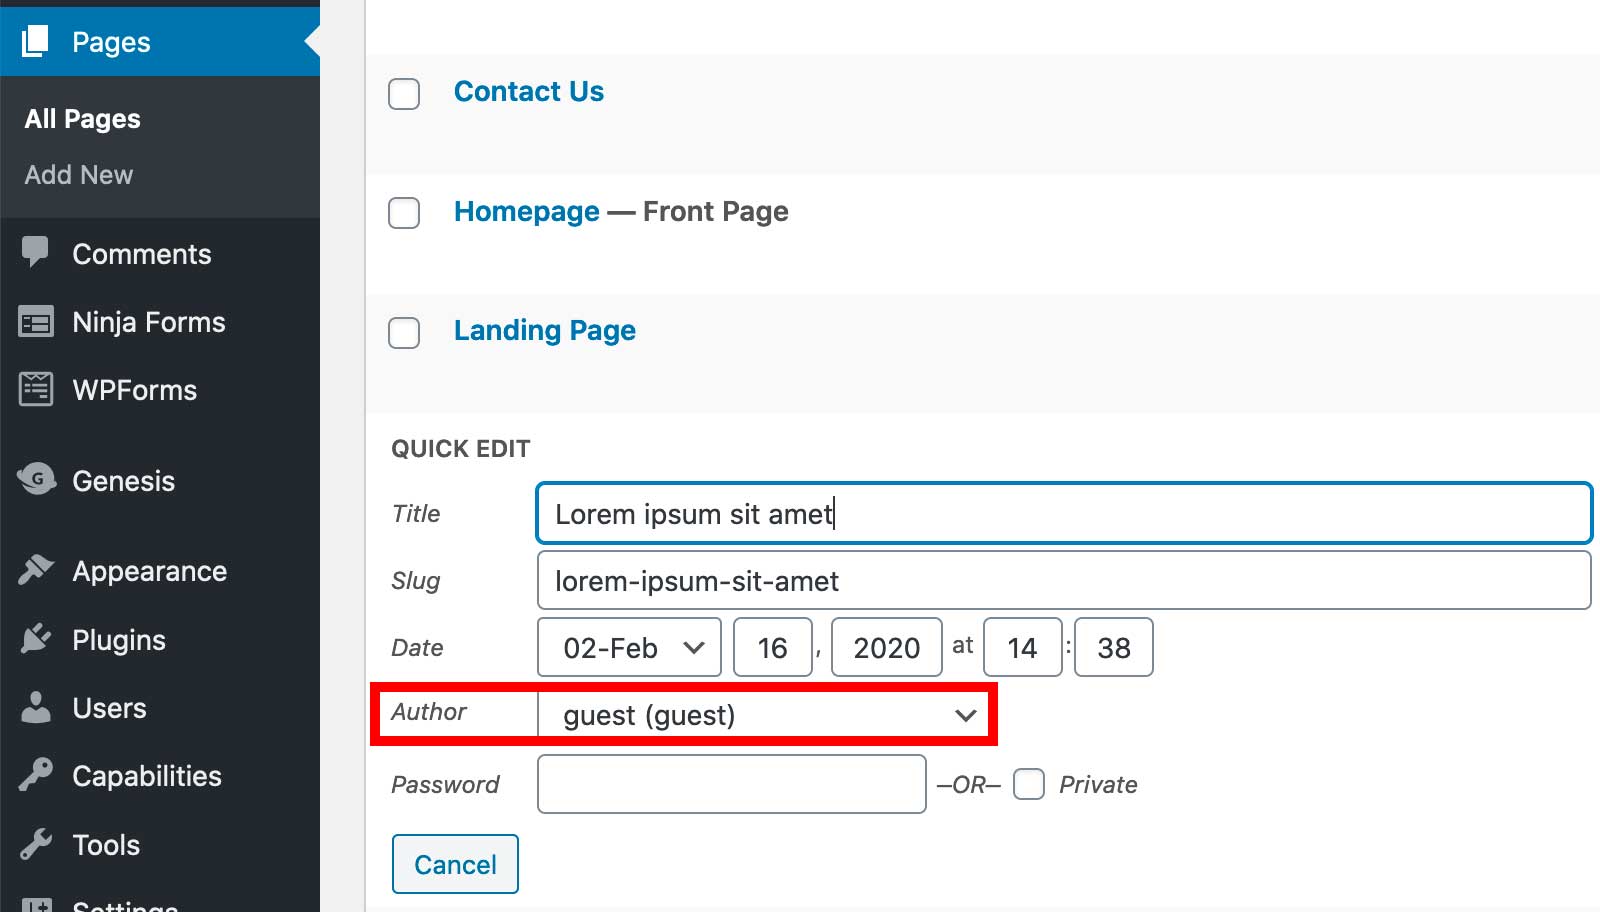
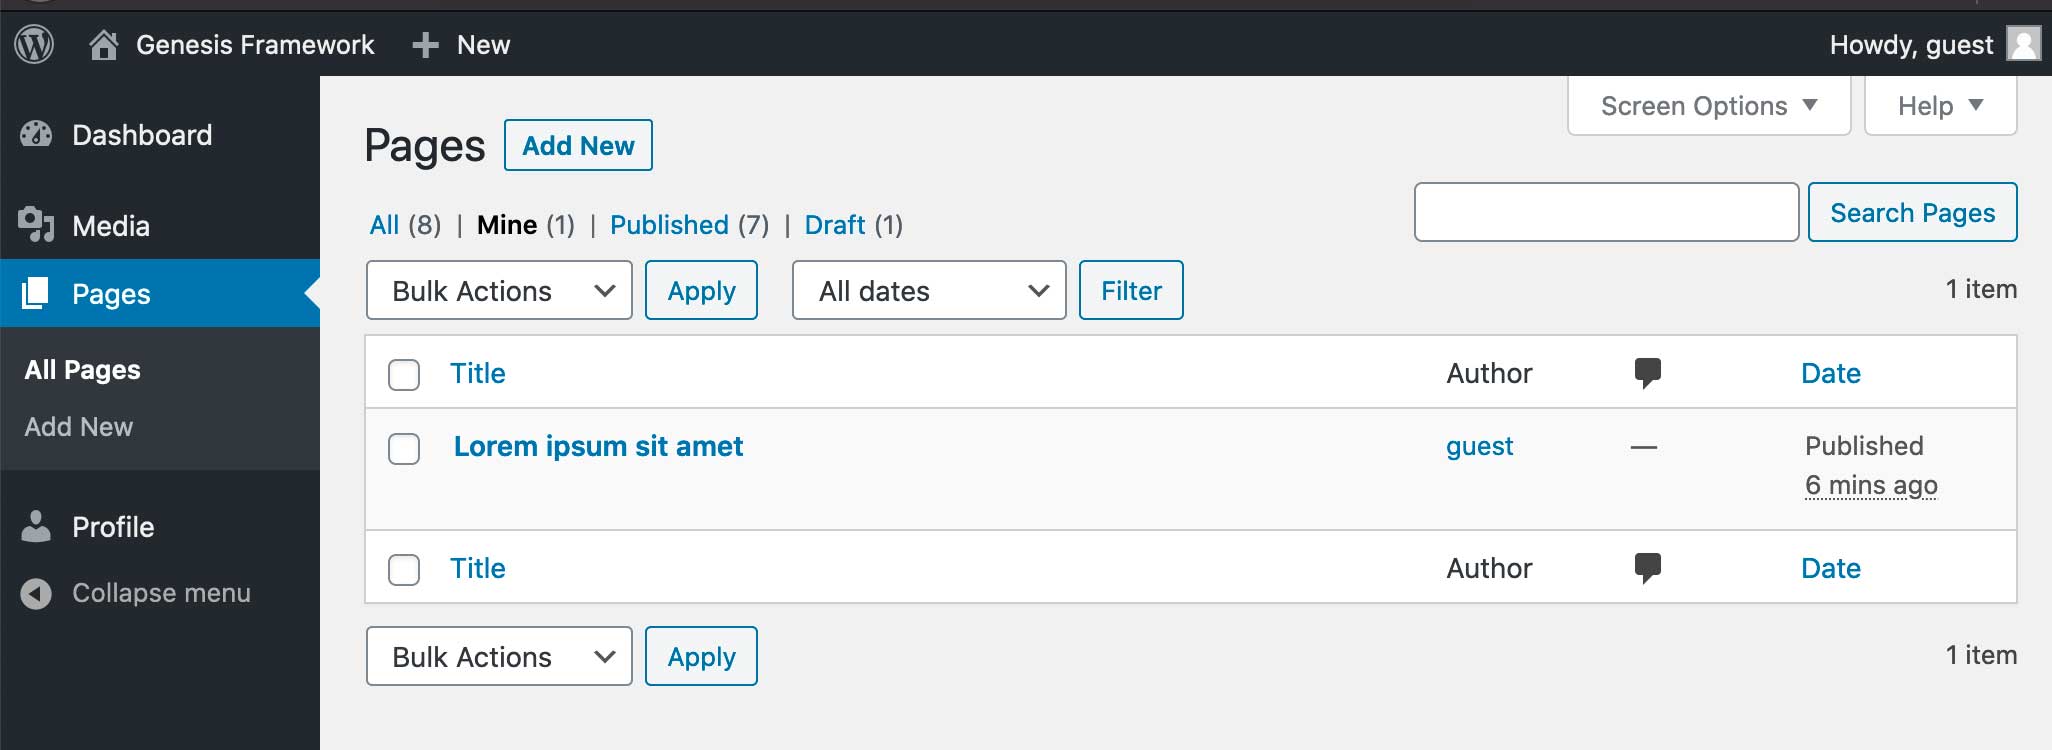
Set user capabilities to edit only specific pages in WordPress
1) Install the PublishPress Capabilities plugin
2) Create a new user with the role editor
3) Uncheck the checkboxes
4) Assign the specific post to the guest user
5) Log in into the guest account with the editor role
As You can see there’s no other pages to edit except this one
User specific CSS for WordPress admin
Add this snippet to functions.php
function add_css_to_guest_user() {
    $guest_user = wp_get_current_user();

    if($guest_user && isset($guest_user->user_login) && 'guest' == $guest_user->user_login) {
        wp_enqueue_style( 'guest_admin_css', get_stylesheet_directory_uri() . '/css/wpadmin-guest.css' );
    }
}
add_action('admin_print_styles', 'add_css_to_guest_user' );
2) CSS
If You want to hide the CF7 menu item on guest user’s WordPress admin use this CSS
#toplevel_page_wpcf7 {
	display: none;
}
How to add custom menu item to the WordPress nav menu
The content between the li tags could be anything You want!
For example shortcode for language switcher, social icons or custom text.
// =========================================================================
// ADD CUSTOM MENU ITEM TO THE WORDPRESS NAV MENU
// =========================================================================
function add_custom_menu_item ($items, $args) {
    $items .= '<li id="menu-item-5000" class="menu-item menu-item-type-post_type menu-item-object-page last">';
        $items .= 'Last Menu Item';
    $items .= '</li>';
    return $items;
}
add_filter( 'wp_nav_menu_items', 'add_custom_menu_item', 10, 2 );
Remove WooCommerce Image Zoom Support in Single Product
// =========================================================================
// REMOVE WOOCOMMERCE IMAGE ZOOM SUPPORT ON SINGLE PRODUCT
// =========================================================================
function remove_image_zoom_support() {
    remove_theme_support( 'wc-product-gallery-zoom' );
}
add_action( 'wp', 'remove_image_zoom_support', 100 );
Change Storefront footer credit text
Remove “Built with Storefront & WooCommerce” text
Create a footer.php file in your child theme and include it in to the storefront_footer hook
Footer copyright
Custom footer with SVG Social icons
SCSS
How to create custom breadcrumbs in WordPress
Remove header cart in Storefront
// =========================================================================
// REMOVE HEADER CART
// =============================================================
function remove_sf_actions() {

	remove_action( 'storefront_header', 'storefront_header_cart', 60 );

}
add_action( 'init', 'remove_sf_actions' );
How to list WooCommerce product categories
// =========================================================================
// DISPLAY PRODUCT CATEGORIES
// =========================================================================
function woocommerce_product_category( $args = array() ) {
    $woocommerce_category_id = get_queried_object_id();
  $args = array(
      'parent' => $woocommerce_category_id
  );
  $terms = get_terms( 'product_cat', $args );
  if ( $terms ) {
      echo '<ul id="myFilter" class="woocommerce-categories">';
      foreach ( $terms as $term ) {
          echo '<li class="woocommerce-product-category-page">';
              echo '<a href="' .  esc_url( get_term_link( $term ) ) . '" class="btn-filter ' . $term->slug . '">';
                echo $term->name;
              echo '</a>';
          echo '</li>';
      }
      echo '</ul>';
  }
}
add_action( 'woocommerce_archive_description', 'woocommerce_product_category', 10 );
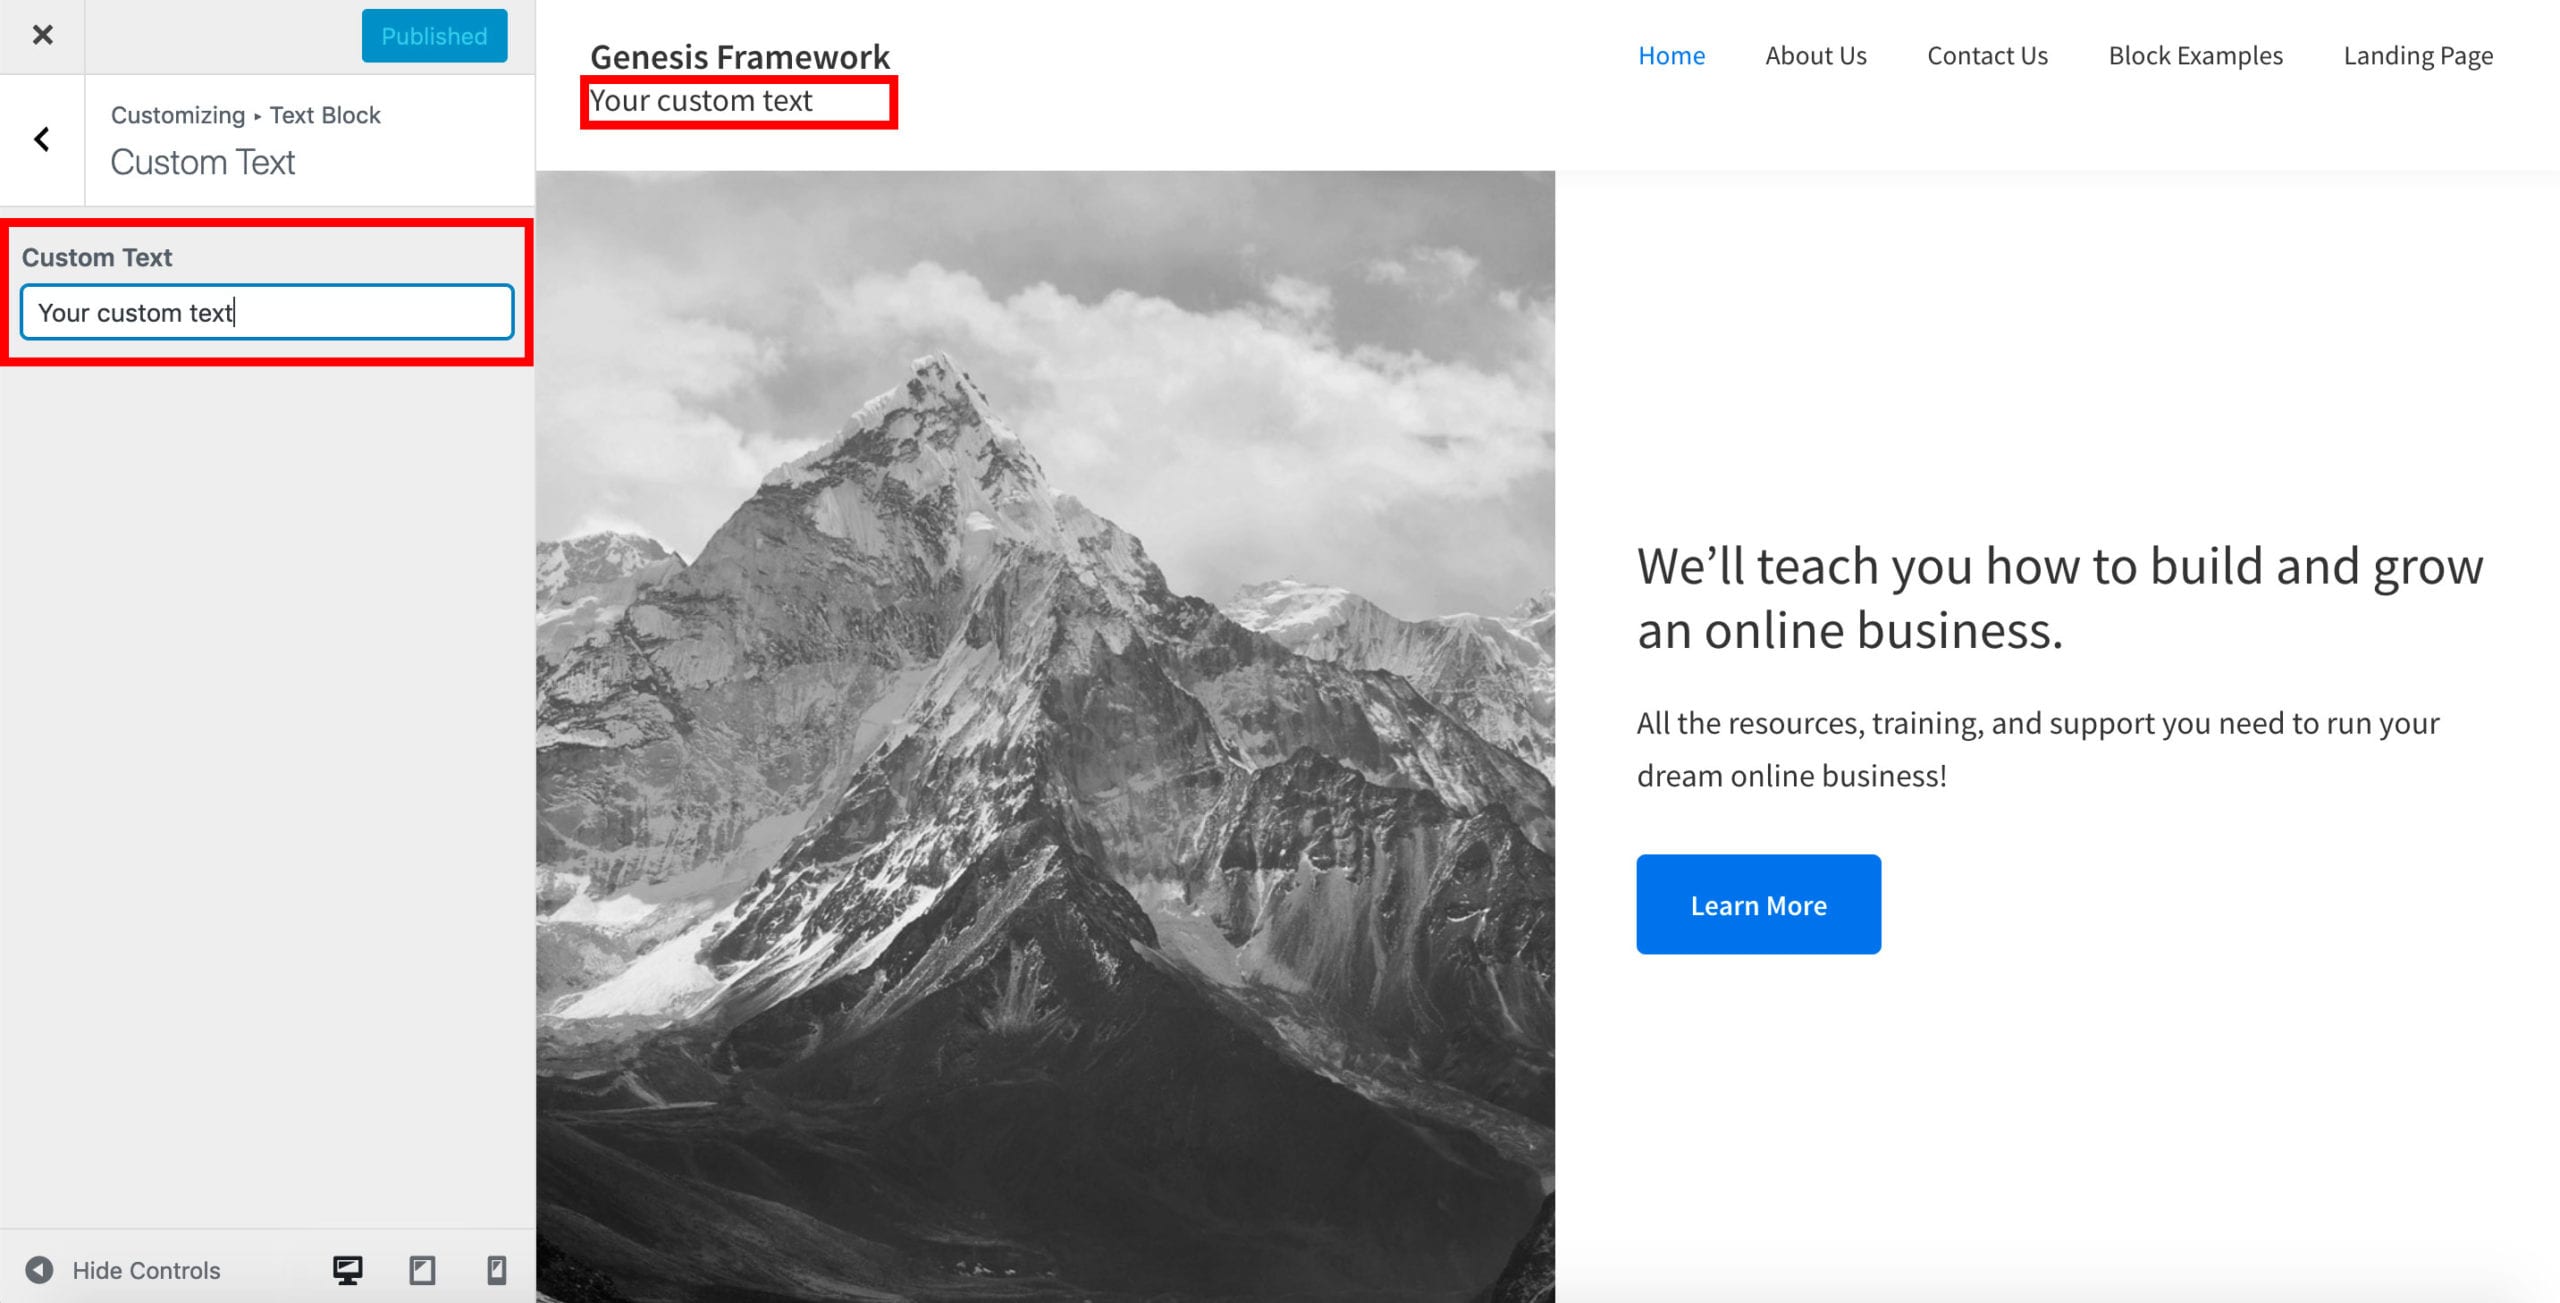
Create a text field in the Customizer and show it in the front end
1) Add this to your functinos.php
// =========================================================================
// REGISTER CUSTOMIZER - PANEL, SECTION, SETTINGS AND CONTROL
// =========================================================================
function theme_name_register_theme_customizer( $wp_customize ) {
    // Create custom panel.
    $wp_customize->add_panel( 'text_blocks', array(
        'priority'       => 10,
        'theme_supports' => '',
        'title'          => __( 'Text Blocks', 'theme_name' ),
        'description'    => __( 'Set editable text for certain content.', 'theme_name' ),
    ) );
    // Add section.
    $wp_customize->add_section( 'custom_title_text' , array(
        'title'    => __('Custom Text','theme-name'),
        'panel'    => 'text_blocks',
        'priority' => 10
    ) );
    // Add setting
    $wp_customize->add_setting( 'title_text_block', array(
         'default'           => __( 'Default text', 'theme-name' ),
         'sanitize_callback' => 'sanitize_text'
    ) );
    // Add control
    $wp_customize->add_control( new WP_Customize_Control(
        $wp_customize,
        'custom_title_text',
            array(
                'label'    => __( 'Custom Text', 'theme_name' ),
                'section'  => 'custom_title_text',
                'settings' => 'title_text_block',
                'type'     => 'text'
            )
        )
    );

    // Sanitize text
    function sanitize_text( $text ) {
        return sanitize_text_field( $text );
    }
}
add_action( 'customize_register', 'theme_name_register_theme_customizer' );
2) Show in the Front End with a hook
function add_custom_field(){
    echo get_theme_mod( 'title_text_block');
}
add_action('genesis_site_description', 'add_custom_field');
In this case I’ve placed the custom text in the site-description, but You can put it anywhere You want using the Genesis Visual Hook Guide.
How to add PDF upload option to WordPress customizer?
1) Add this snippet to functions.php
// =========================================================================
// CUSTOMIZER PDF UPLOAD
// =========================================================================
function pdf_customize_register( $wp_customize ) {

    // Add Settings
    $wp_customize->add_setting('customizer_setting_pdf', array(
        'transport'         => 'refresh'
    ));

    // Add Section
    $wp_customize->add_section('pdf_section', array(
        'title'             => __('PDF', 'name-theme'),
        'priority'          => 70,
    ));

    // Add Controls
    $wp_customize->add_control( new WP_Customize_Upload_Control( $wp_customize, 'customizer_setting_pdf', array(
        'label'             => __('PDF Upload', 'name-theme'),
        'section'           => 'pdf_section',
        'settings'          => 'customizer_setting_pdf',
    )));
}
add_action('customize_register', 'pdf_customize_register');
2) Displaying in the Front End
<a href="<?php echo esc_url( get_theme_mod( 'customizer_setting_pdf' ) ); ?>">Download PDF</a>
Split Menu Around the Logo in Genesis Sample
1) Install and activate WP Nav Plus plugin
WP Nav Plus has been designed to fill gaps in the WordPress menu system which make it difficult to accomplish many popular website design patterns.
2) Add this snippet to functions.php
//Remove original genesis header
remove_action('genesis_header','genesis_do_header');

//Crate Left / Right menu widget areas
genesis_register_sidebar( array(
	'id'          => 'header-left-menu',
	'name'        => __( 'Header Left Nav Menu', 'wpflames' ),
) );

genesis_register_sidebar( array(
	'id'          => 'header-right-menu',
	'name'        => __( 'Header Right Nav Menu', 'wpflames' ),
) );

//Create the function that split the navigation around centered logo
function wpflames_header_widgets() {

if ( is_active_sidebar( 'header-left-menu' ) || is_active_sidebar( 'header-right-menu' ) ) {

    echo '<div class="row">';

	genesis_widget_area( 'header-left-menu', array(
		'before' => '<div class="col-lg-5 header-nav-menu header-left-menu">',
		'after'  => '</div>',
	) );
    echo '
      <div class="col-lg-2 logo">
          <img src="YOUR_IMAGE_SOURCE" alt="">
      </div>';

	genesis_widget_area( 'header-right-menu', array(
		'before' => '<div class="col-lg-5 header-nav-menu header-right-menu">',
		'after'  => '</div>',
	) );

    echo '</div>';
	}
}
add_action( 'genesis_header', 'wpflames_header_widgets' );


function remove_hamburger_menu_from_desktop(){
    if(!wp_is_mobile()){
        remove_action( 'genesis_header', 'genesis_do_nav', 12 );
    }
}
add_action('init', 'remove_hamburger_menu_from_desktop');
3) CSS
/*ONLY MOBILE*/
@media (max-width: 768px) {
        .header-left-menu,
        .header-right-menu {
        display: none;
    }
}


@media (min-width: 768px) {
        #menu-left-menu, #menu-right-menu {
        display: flex;
        justify-content: space-evenly;
    }
}